TechDealDigger Home | Login | My Alerts
Deals Coupons Blog About Us Contact Us Submit Deals
RSS

Archive for the ‘Home Video’ Category

Hide & Control Your A/V Components Using an IR Repeater

Tuesday, February 24th, 2009

A common challenge when setting up a home theater system is figuring out how to hide your components out of view while still being able to control them via your infrared remote.   This situation has become even more common as large entertainment cabinets have given way to flat-panel wall mounts and sleek HDTV stands.

The good news is that for about $100 you can easily install a fairly simple device that includes a small, inconspicuous IR receiver that will connect via a thin wire to emitters that will control your receiver, DVD player, cable box, and gaming system behind a closed cabinet door.  When you press a button on your remote, the IR receiver will relay the signal to your emitters located on each of your devices, which will then control your devices.

In order to control your hidden components, you’ll want to pick up an IR repeater (I recommend the Xantech 480-85 Dinky Link IR Receiver Kit).  This Xantech model costs $105 and features 4 IR emitters meaning you can control up to four different hidden components in addition to your TV.  It is also specially designed to filter out the IR interference that causes some relay products not to work with certain LCD TVs.  If you need to control more to control more than four components, you can swap out one or more of your emitters with a double-emitter.

The kit consists of 4 components:  The Dinky Link IR Receiver, A Connecting Block, Power Supply and 4 IR Emitters.

Installation is fairly simple.

1.  Move your components to the desired cabinet of closet.  Make sure that there’s some ventilation as you don’t want your components to overheat.  You might want to stick some spacer blocks between your components to improve air flow.
2. Place the IR Receiver on or near your TV.  These receivers come in both black and silver and are no larger than a cigarette, so you can just stick the adhesive back to the bezel of your TV and you will hardly notice it.
3.  Run the 7 foot ribbon wire of the Dinky Link™ back to the location where your components will be.  If you need to run the wire longer than 7 feet you can just splice the 3 wire cable to any cable (like the individual wires of a cat5 cable)
4. Connect the ribbon wire to the connecting block
5. Plug in the Emitters 3.5mm mono mini plug to the connecting block and then affix the self-adhesive Emitters to the front face of your components.  You’ll need to locate the IR receiver (usually a small dark window) on the front of your devices.  Also, take care with the emitter cables – they are fairly delicate and you don’t want to short one out.
6. Plug the connecting block in using the attached power supply.
Here’s the wiring diagram:
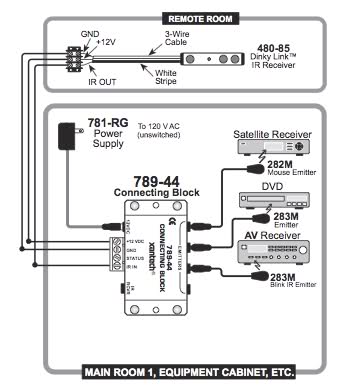
Once you’re setup, test the system and make sure everything is working properly.   The most common problem is not properly positioning the IR emitter right over the IR “eye” on your components.  If you can’t figure out where it should go, try looking at the owner’s manual for the component – usually the manual will show you where the IR “eye” is.

Unless you need to run your cables a long way, most people will be able to complete this job in less than an hour.  Hiding your components is a great finishing touch to any home theater installation and is easier than you think.

Getting the Best Price on an HDTV

Friday, September 26th, 2008


If you’re in the market for an HDTV (LCD or Plasma), you’ve probably noticed that prices have fallen steadily over the past few years.  This is great news for consumers who can now get more TV than ever for their money.  What you may not know is that, with a little patience, you can score a deal on an HDTV that could save you several hundred dollars off these already-low prices.


Tip #1 – Figure out which features are important to you.  Comparing TVs can be a daunting task with the array of features and specifications.  However, focus on a few key dimensions like display size, resolution (720p vs. 1080p), response time and scan (refresh) rate.  Having an understanding of your preferences on these key dimensions will allow you to compare different models.


Tip #2 – Be flexible on brand.  You may not find a great deal on the exact Sony KDL-46XBR4 you wanted, but you may find a great price on the comparable Samsung unit.  In many cases, the actual LCD panels are produced by the same supplier.


Tip #3 – Compare prices online.  Generally, the best prices are available online and most retailers now offer free shipping on LCD and Plasma TVs.  You can use a tool like PriceGrabber and you’ll get a general idea of the lowest prices for a particular model.  Don’t stop here, however.  These price comparison sites generally don’t reflect special discounts offered by certain retailers.


Tip #4 – Wait for a deal.  Eventually, there will be a promotion or special on the TV you are looking for and you could end up saving hundreds of dollars.  For example, Fry’s recently ran a promotion on the Samsung LN52A530, a wonderful 52” 1080p LCD TV, making it available for $1,499 with free shipping.  That’s $300 less than the best price on PriceGrabber.  To make sure you never miss a deal, use a website like SlickDeals.net or TechDealDigger.com, which post links to particularly large discounts on electronics and other technology products.  You can even set up an alert, say, to be notified of all deals on 37” LCD TVs.


Tip #5 – Check user reviews.  Once you find a great deal, make sure that other buyers have been happy with their purchase.  User reviews are often more helpful at uncovering “dealbreaker” flaws within a television that an editor, who is just using the TV for a couple days, might not uncover.  Amazon.com is a great source for checking customer reviews on HDTVs.  Look for at least an average rating of 4 (out of 5) stars and pay attention for any consistent complaints.


Tip #6 – Buy with a credit card that offers purchase protection.  American Express, for example will double your manufacturer’s warranty and even protect the item against accidental damage during the first 90 days of ownership.  Visa Platinum cards offer similar protection. 

Blu-ray Disc Player Prices Coming Down

Tuesday, September 9th, 2008

For nearly 2 years, Blu-ray disc players have hovered in the $350-500+ range.  With Blu-ray having emerged as the de-facto standard for high-definition disc playback, Sony and it’s licensees didn’t seem to be in any rush to start lowering prices and compressing margins.   As a result, adoption of standalone Blu-ray players has been relatively limited — with fewer than 4 million having been sold in the U.S. by the end of last year.


We’ve seen some budget Blu-ray players in the $300 range, but today we saw Amazon drop the price on the highly-rated Panasonic DMP-BD30 Blu-ray player to under $250 after a special discount.  This player was rated by ConsumerSearch as the #1 choice for a standalone DVD player.  We’re looking forward  to similar discounts from other manufacturers and retailers.

Search
Archives
  • February 2009
  • October 2008
  • September 2008
  • Categories
  • Home Video (3)
  • Uncategorized (1)